So, you want to learn how to play the guitar?
Guitar is a beautiful instrument and it’s also a very fun instrument to play! With this guide, you can strum along to your favorite songs within days of picking up a guitar.
In this guide, you will learn:
- The basic parts of a guitar
- How to hold your guitar
- The most basic and common chords, and how to play them
- How to hold a guitar pick
- How to strum
- And plenty of helpful tips for beginner guitar players
So let’s jump in!
1. The Parts of a Guitar
We’re going to go into a little more detail about how to use these specific parts of the guitar in some of the other sections so you can learn how to play guitar properly.
To start out, let’s start with the first thing you’re going to do once you get yourself a guitar:
Hold it!
Holding your guitar
Seated

You’re going to hold a guitar with your non-dominant hand holding the neck, and your dominant hand within very comfortable reach of the strings over the sounding hole.
Rest your (dominant) arm/elbow over the body of the guitar. Notice that both your arms are bent. Your arms are also not rigid, nor are your joints locked. Relax your arms, and don’t grip the guitar, or anything like that. Just let the bottom curved edge of the body rest on your thigh and find a natural way to hold it that feels good and doesn’t put stress on your arms or your wrists.
If you’re a visual learner, you can check out this video:
How To Hold An Acoustic Guitar – Guitar Lessons
Standing

Mostly when you’re standing to play guitar, you’re going to want a guitar strap.
And the same rule applies as above, with sitting–you want to hold it in a way that’s natural. So, you’re going to want to adjust the strap of the guitar so that it holds the instrument in a very comfortable position for both your hands. Notice in the photo above how the guitarist’s right arm is in easy reach of the sounding hole, even as he bends his elbow so he’ll be able to play with ease.
With how to angle the guitar, focus on the comfort level of the wrist that is holding the neck of the guitar.
The most important thing here (though you’ll most likely feel it if you do this incorrectly) is to make sure that you don’t crunch the wrist of your fretting hand (the hand you’ll be playing chords on the fretboard with). Notice the guitarist in the photo–see how his left wrist is at a very comfortable angle.
Most guitarists angle the neck of the guitar up toward their head, like the man in the photo. If you hold the guitar too straight, like you would more so if you’re sitting, you’re going to feel a lot of pressure on your wrist, and you’ll even have difficulty playing chords.
Now that you know how to hold the guitar, let’s play it!
2. The Six Strings & Fretboard

In order to learn how to play chords, the first thing we need to learn is the 6 strings.
You can see in the diagram above which strings are which (imagining this guitar is in an upright position). The order of the strings goes E, A, D, G, B, E. The way to remember the order was with the acronym “Eddie Ate Dynamite, GoodBye Eddie.” The strings also go by numbers, as you can also see in the diagram. From left to right, they go from 1 to 6. Depending on what you’re learning from, you’ll hear people interchange calling the strings by their note names, or by their numbers. So it’s just good to know both!
Finger Numbering
To play chords, you’re going to either be watching tutorials on YouTube, reading chord diagrams (or, if you’re well-versed in music theory, reading actual sheet music). The first two ways are the most common and the easiest, and in them you’re going to hear people talk about which of your fingers to put on which string. (Your hand holding the neck of the guitar can also be called your fretting hand.)
Here’s a brief list (this applies to whether your fretting hand is your left hand or your right hand):
- Forefinger/Pointer finger: 1st finger
- Middle finger: 2nd finger
- Ring finger: 3rd finger
- Pinky finger: 4th finger
Frets
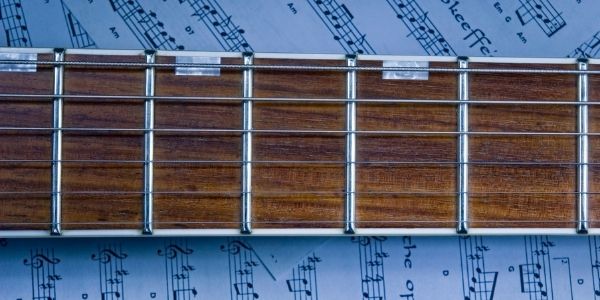
This is the fretboard of your guitar.
Frets are the rectangle-shaped spaces separated by bars all the way down the length of the fretboard. In each fret, you have the option of pressing down on each of the six strings in the space between the bars. These all represent one note. So, if you press your finger down on one string, exactly where that arrow is pointing, you are playing a note.
You only want to put your fingers in between those bars; you do not want to play on top of them.
The frets on a guitar are in chronological order from the head of the guitar, all the way down toward the sounding hole. It starts at 1 and increases as it goes. Using that, you can see that the 1st fret is the first one you see by the head of the guitar, followed by the 2nd all the way into the teens.
Tips for your fretting hand/fingers
The way your left hand should be positioned is, first, very relaxed. You should not be gripping the neck of the guitar, nor be putting any sort of pressure on your wrist.
Make sure your palm is not touching the neck of the guitar. If it is, you’ll have no flexibility necessary to play or switch between chords.
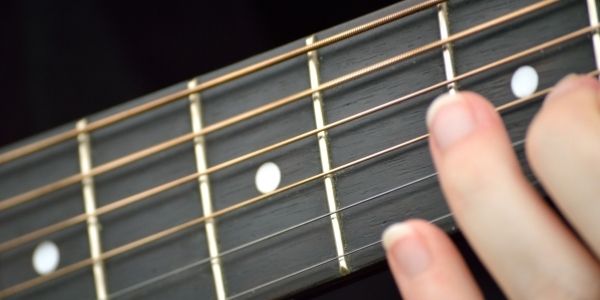
Take notice of placing his thumb (though thumb placement can vary based on the chord you’re playing), and also look at his wrist placement. See how loosely he’s holding the instrument? Look at your own hand and make sure your hand position is at least similar.
3. Holding a Guitar Pick
Now that we’ve got your fretting hand all set, let’s look at your other hand.
In this guide, we’ll refer to this hand as your strumming hand.
The first thing we’ll learn is how to hold a guitar pick.
- Hand position
The first thing you do to hold a pick is set up your fingers for it. The easiest way to explain how to do so is to perform the gesture for “money”, where you move your thumb across the side of your pointer finger.
Now, do that gesture once, and freeze your fingers. You’ll stop with your hand loosely in a fist, and your thumb pressing against the side of your bent forefinger.
Now, lift your thumb up, moving nothing else.
Take your pick with your left hand.
And then, place the pick over the first knuckle of the side of your forefinger, the tip of the pick angled toward you, toward where the strings are.
Then, replace your thumb over the pick, and hold on to it.
Now, you can uncurl your fist, only moving your middle finger, ring finger and pinky into a relaxed position however they want to be.
Now, you’re holding the pick between your forefinger and your thumb.
This is how you hold a guitar pick.
Note: you do not need a crushing hold on this at all. Just hold the pick so that you don’t drop it. Your fingers should still be 90% relaxed doing this.
Practice picking each string one by one, and find a good pressure for both holding the pick between your fingers, and for picking each string.
4. Strumming
We just went over how to hold a pick, so keep those tips in mind when we’re strumming. You want a relaxed hold on that pick, and you want your hand, wrist, and arm to be relaxed as well.
When you strum, you don’t want to use much force.
Try this now: rest the pick near the top of the 1st string over the sounding hole, and then lightly run it over the 6 strings (called a down strum). If you hear an abrupt pluck from any of the strings, you’re using too much effort. This should be very gentle and light.
This is the idea you want when you’re strumming.
Now, starting from the bottom of the strings at the 6th string, place your pick there over the sounding hole, and drag it up all six strings with the same gentleness (called an up strum).
Practice this effort-level to get the hang of it.
TIP: If you want to practice strumming without all the noise, gently rest your fretting hand over all 6 strings anywhere over the fretboard. Don’t press; just lightly rest your fingers on the top of the strings. Now, strum, and you’ll hear a quiet muted sound. We call this muting the strings. This is a great tip to use if you’re just working on strumming patterns, and so you don’t have to worry about doing anything with your fretting hand so you can focus completely on the strums.
When you are strumming, you’re going to want to move your entire forearm. Don’t just move your wrist. Your wrist should be pretty in line with what your forearm is doing. As you strum, you are going to want your forearm to move almost like it’s on a hinge at your elbow. You really don’t need to move your arm in big motions and keep your hand very loose.
Strumming Patterns
There are endless strumming patterns you can use to play guitar, and you can even make up your own.
A strumming pattern is the pattern of up strums, down strums and the timing of them for each measure of a song.
Here is a video of the most basic guitar strums! Beginner Strumming Patterns For Acoustic Guitar Pattern 1 – Beginner Guitar Lessons
Again, mute the strings to practice these patterns to make it easier for you to focus! You learn best through lots and lots of repetition.
5. Chords
Now we can finally start learning some of your favorite songs!
To learn how to play songs on the guitar, you’re going to need to learn how to play chords.
To put it in the simplest form, chords are just 3 or more notes played at once.
What’s nice about chords is that there are certain chords that simply sound great together, so many of your favorite songs reuse the same ones repeatedly. That means, once you learn some of these basic chords, you’ll be able to play countless songs right off the bat!
Check out the “Four Chord Song” by Axis of Awesome for proof of that! Axis of Awesome – 4 Four Chord Song (with song titles)
The chords I’ll give you in this guide are:
- E minor
- C major
- G major
- D major
- A major
- F major
NOTE: If you need a chord that I haven’t listed in this guide, just type into Google “[chord name] guitar chord diagram” and you’ll find every chord you’ll need!
Let’s start with the easiest chord to play (E minor, or also written as Em), and learn how to read a chord diagram.
E minor
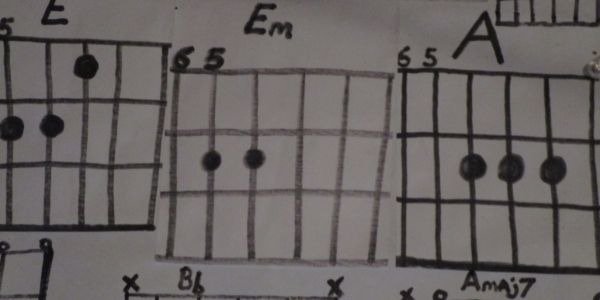
The above image is called a chord diagram, and it shows you how to play a chord. Here, it’s showing how to play the Em chord.
The overall diagram is that of the 6 strings of the guitar (it will always go left to right, from low E, A, D, G, B, to high E).
At the top of the diagram, you can see the bold line—a bold or double line always represents the first fret of the guitar. If you see that, it means you’re looking at the very top of the guitar neck.
You will also see on the left side of the diagram the numbers listing down 1, 2, 3 and 4. These are notating the frets you should work with. If, say, the numbers were instead 7, 8, 9, 10, then you would work with the 7th fret of your guitar, and so on.
Now, as for what your fingers will do, that is notated with the black circles on the diagram, with the numbers in them. These circles are showing where to put your fingers, and the numbers on the circle show which finger to put there.
Chord diagrams show you the fret, string, and finger position for each chord.
For E minor, you can see that your 2nd finger (your middle finger) presses down on the A string on the 2nd fret, and your 3rd finger (your ring finger) presses down on the D string, also on the 2nd fret.
You want to press the string hard enough that the string touches the fretboard. If you hear a buzzing sound, then you’re not pressing hard enough, or your finger is perhaps touching another string, and it’s vibrating. Just press hard enough for the note to come out cleanly; don’t press so hard that you unnecessarily hurt your fingers.
If you realize your finger is touching over one string, try to press your finger straight down on top of the string, rather than angled.
Note: your fingers will hurt in the beginning. This is normal! You’ll see a lot of indents in your fingertips from the effort it takes to press the strings, but over time, the fingertips of your fretting hand will become tougher and won’t hurt.
Now, pressing down on those strings, strum to hear the chord.
You’ve just played your first guitar chord!
6. Bar Chords
Bar chords (also called power chords) are chords played where you “bar” the side of your finger (usually your first finger/pointer finger) across multiple strings at once and hold them down. You’ll often have other notes to play so the hand position for bar chords can be quite difficult in the beginning.
Here is one of the most common bar chords that also shows up in many of the most popular songs:
F Major.
In this chord diagram there is a bar along all 6 strings on the first fret.
You can also see the number 1 on that bar—that means that your first finger will press down on all 6 strings (barring them), and you will also play the other noted strings, with your 2nd finger on the 4th string, 2nd fret; 3rd finger on the 2nd string, 3rd fret; and your 4th finger on the 3rd string, 3rd fret.
When you play it, your hand position will look like this:
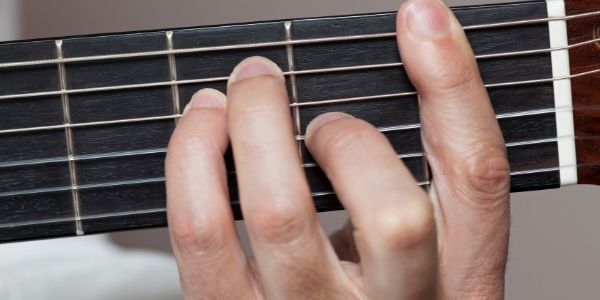
Bar chords can be quite challenging in the beginning of your guitar journey. Especially with the fact that bar chords take a lot more muscle than playing the basic chords listed above, so your fingers might not be up to this for a few weeks.
But have no fear; if you want to play a chord but don’t want to learn bar chords, all chords can be played in over one hand positions.
If you Google a chord, for example, say, we take this one (F Major) you will see a variety of non-bar ways to play it:
Bar chords take a while to get used to it. It tends to hurt your first finger in the beginning, but just like your fingertips, the side of your forefinger will eventually become slightly tougher skin, and it will not hurt over time to play bar chords.
Since bar chords are a much different type of hand position, let’s learn how to play the F Major bar chord!
Bar your finger first
First things first, you don’t want to play all of your fingers at once. What you want to do is able to successfully bar your finger over all the strings first so that the sound comes out clean when you strum.
So, lay the side of your pointer finger across all the strings of the first fret (look at that photo of the hand position so you can match what it looks like!). Press down until the strings touch the wood of the fretboard, the same way you would if you were playing a single string.
You’ll quickly notice that this is harder and requires more strength and effort than non-bar chords. Don’t worry! After some practice, it will be just as easy as any other chord.
Strum across the strings when you feel you have your hand positioned correctly.
If you hear a blunted or muted sound, you aren’t pressing down on the strings hard enough.
Press harder until you get rid of that blunted sound, and you hear the strings resonate clearly.
NOTE: this may take a while for you to maintain a clear sound, as your fingers are not used to using your muscles like this, and, well, it hurts a bit in the beginning. Practice doing this over and over for 15-20 minutes a day, just practicing maintaining this clear sound. It will get easier the more you do it.
Add your other fingers, one by one
Once you get a clear sound from your barred finger, now it’s time to add the other fingers.
Do this one by one! Do the easiest fingers first, which I would say is the 2nd finger.
Bar your first finger first, then add your second finger, and strum. If it comes out clearly, great job! Add your 3rd finger, and then your 4th when that one comes out clearly.
Practice this until all 4 fingers come out clearly, and look at that!
You just successfully played your first bar chord!
Practice this often! Eventually, it will feel very effortless and easy.
7. How to Learn to Play Your Favorite Songs
There are so many online resources these days that supply the chords of your favorite songs!
One of the best resources is Ultimate Guitar.
But there are many choices! Simply type into Google “[song name and artist name] guitar chords”, and you’ll see a bunch of chord sheets come up.
They’ll look like this:
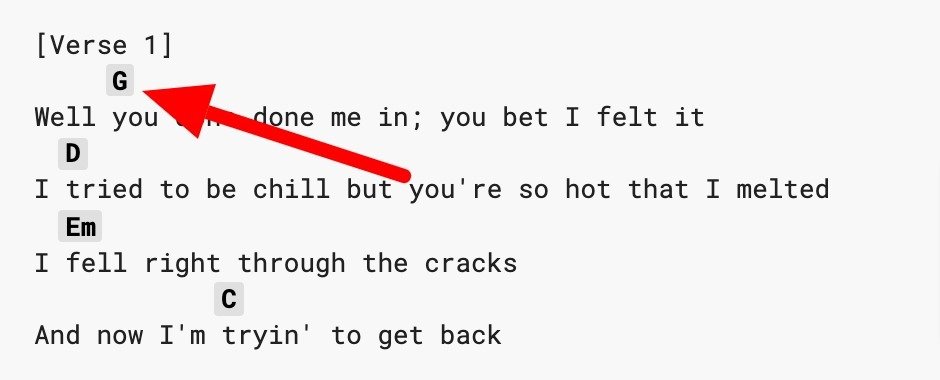
“I’m Yours” by Jason Mraz
You’ll notice that the lyrics are written out, and there are chord names above the lyrics. These chords are written in the exact place where you will start playing the chord. Plus, in most of these sites, if you hover your cursor over the chord name, it will show you the chord diagrams of different ways to play the chords.
To practice, play the song, and try to play along yourself!
If you are also a singer, it can be pretty complicated to play and sing at the same time in the beginning. Lucky for you, I wrote an article with tips for just that! You can check it out here!
Conclusion
It is never too late to pick up a guitar and start learning!
Pull up the guitar chords to your favorite songs (if you haven’t already!) and start playing along. Congratulations on the start of your musical journey, and don’t forget to enjoy the process!
How did your first day as a guitarist go? Let me know in the comments!


